DEV BLOG 04
- Feb 24, 2017
- 10 min read
Adding Harvesting/building and effects
This week i focused on getting variables to save so that it was in preparation for the ability to skip ahead 8-12 hours using the sleep mechanic as well as allowing the player to save the current state of their game. I re-did the day/night cycle to give better access to the variables within them and started creating the menus/u.i.
Day/night cycle rework
I found a better way of using a day night cycle that gives me better control over the blueprint as well as access to the time of day variable and a few others. This means I can save the variable at the time the player choses to do so (for the sleep mechanic), for example 18:00hrs and then add 8-12 hours to it. Do some sort of transition and it will appear as if they have slept for the said amount of time. Also if I ever need a certain scene to start at a certain time i.e. day or night then I have access to change that variable to suit.

Before I had to change the time by changing the script. Now it is accessible straight from the blueprints details panel. Also there are a lot more variables I can change such as days/hours/minutes and I now even have control over the clock format as well as when the sun rises and sets.
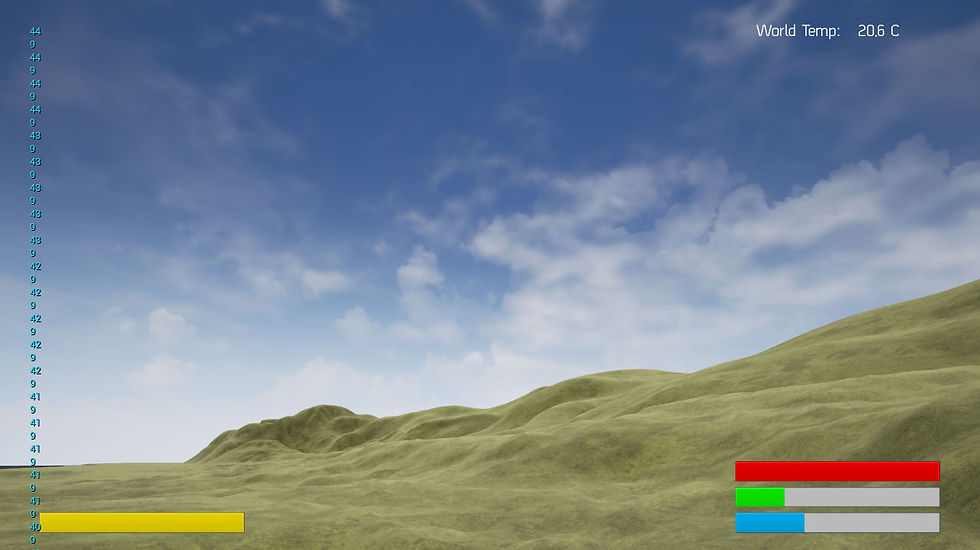
Added first iteration of temperature mechanic I added temperature to the game. It is available in both fahrenheit and celsius. The game has a default temperature (50 in my case). As the day comes to an end and night time falls it alters the temperature variable. Nights tend to be a lot colder so it goes from around 30 degrees celsius all the way down to -1. I plan to have the temperature start to decrease a players health when they are too cold in a future update. But its in and working and has a temporary text base u.i. in the top right hand corner which can be revisited at a later date.
Here is the temperature during the day. Take note of the time (added as a print string on the left side of the image). 9.45 thereabouts in the morning and the temp is set to 20.6 degrees C.
And here is the temperature at night. notice the time again and the fact that the temperature has dropped below 0. 00:15 thereabouts and -0.9 degrees C

Storing Variables
I have added the ability to save selected variables. For the time being the game now saves, Health/Hunger/Thirst/Player Location/Player Rotation/Controller Rotation and Player Velocity when the button "N" is pressed. Players can then exit the game and restart with the variables set to that of when the save button was pressed. In a future update I am looking to also save the time of day as well as the position/rotation of the sky sphere and sun.
Below is an image of a game session, Again take note of the time as this is when I have pressed the save game button.

The next image is after the game has been closed and then opened again. The variables from the health/hunger/thirst are all the same but the time has changed back to the default start time (as i haven't applied the save function to the day/night cycle). This shows it working as intended.

I added the a basic clock into the game. It is a basic text element like the temperature (which I will update at a later date) that allows the player to see what the current time of day is. This is good for when the player needs to know if nighttime is approaching so that they can start to return home as well as any quests/missions I may choose to add that are only available at certain times of day.
This is the clock during the day.

As you can see in the top right, the current time of day is displayed. 10:18 in this case so a nice bright morning.
And this is the clock at night.

Just after midnight, dark and the stars are out.
I have also added a "Days" variable as this could help me in the future if I have events that fire off say every 3 days or something. As you can see, we are into the morning of the next day so 1 has been added to the days in the u.i.
Terrain
I started texturing the terrain. I am using a program called Landscape Auto Material. I auto generates terrain based on slope angles. As you can see in the image below, it adds grass on areas below a certain angle and then when the angle becomes more aggressive it starts to add in slope detail (the rocky parts).

I can now go in further and paint areas such as mud paths, sandy beaches and much more.
Trees Harvesting This is my first attempt at adding harvesting by way of trees and then using the resources gathered to apply them to the building system.
For the tree Harvesting there are currently no animations involved (may or may not add them later). The player looks at the tree and when the left mouse button is pressed, a line trace is made.

If this line trace collides with the tree then it will reduce the trees health by 20 (max/current health is set to 100) then after 5 traces it will destroy the actor.

When health is deducted the player also gains 20 wood (which is shown underneath the temperate in the u.i.).

This is temporary but shows that it is working.
Church
I added a model of a church that i purchased. it is a decent size and can be see from a distance. However the model comes with an interior but the doors were static so i had to go into 3DS Max and manually take the door out. I think I may leave it doorless for gameplay reasons but nevertheless the player can now enter and exit as they please. Later I will add spawn locations for loot.

Building System
for the building system it currently is very buggy, when the player spawns the ghost of the object (in this case the square foundation) it doesnt always spawn it straight.
Also i set up a boolean which checks if the player has more than 100 wood. When they do the boolean is set to true. This stops the player placing multiple foundations to start with, once the boolean becomes true they can then place a foundation and it reduces the players wood count by 100. However for some reason (that i need to look into) the boolean will not set back to false if the players current wood count is less than 100. So as of now I can stop them from placing building objects when they spawn in, however when they collect 100+ wood they can then continuously place them. This is something i intend to fix at a later date.
There is a green ghost of the object

And a red ghost of the object

The green shows that the object is on a surface and can be placed (if enough wood is collected). I also am looking to add a boolean to check if the object is colliding with anything and if it is also turn it red and stop the player from placing the object. There is also a problem with snapping the object to a foundation already placed that needs addressing in a future update.
Here is a video example of both the tree harvesting and the building system in action.
Ocean
I decided that the current ocean texture was in need of an update so looked into changing it. I found a good texture and altered the variables to suit my needs.
The old one was reflecting light everywhere and looked awful.
Here is an example below.

It also looked very bad from further away as you can see here.

The new one handles the light reflection really well and in general just looks 10 times better close up and from afar. Here are the examples of the new ocean.
Close Up

Afar

It looks so much better and could maybe in the future look into making it more realistic by adding waves and foam.
Fog
You may be able to tell from the new ocean examples that i have added a fog effect to the level. I think it helps with immersion, realism and also helps fade out the distance of the map.
Here are the before and afters
Before

After

Rain
I also added rain to the game. It is pretty simple at the moment and i have it enabled as soon as the game begins. I may think about adding it to a timeline with random points in which it will enable and disable itself but for now its in and working.
The rain falls over the scene and when it hits the floor the particle kills itself and a splash particle spawns and bounces and then that also kills itself.
The main problem I am having with it at the moment is that the rain passes through the church so you can see it inside.
Here is an example of it below.
INVENTORY
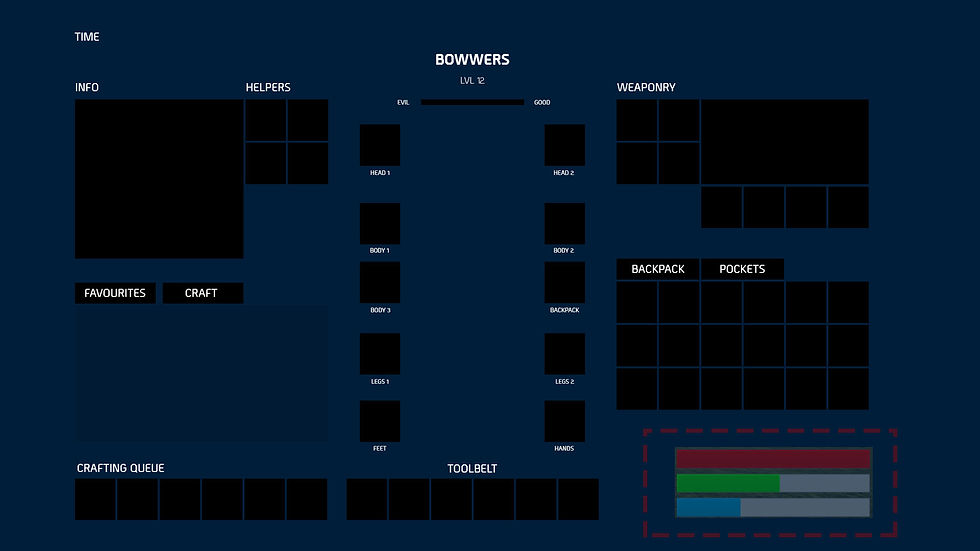
I added an inventory user interface to the game. This is more of a concept and will need functionality adding to it but it gives you a general idea of what I am going for. I went into photoshop and laid it out how i wanted it.
I then added a widget that changes visibility on and off when pressing "i". The toolbelt is technically in the inventory but I also wanted it to be displayed in the players H.U.D. so basically even when the inventory is closed it is still displayed on the screen. To do this I just added it to the H.U.D. widget and then set the z order to 1. The inventory z order is 0 so the H.U.D. will be layered on top of the inventory screen. I also did this for the player attributes and moved the time and temperature into the inventory widget and off the main H.U.D.

I then started laying everything out in the widget editor to look similar to my layout i did in photoshop. I did make a few adjustments here and there and this is what I came up with.

Next i added a live player view to the inventory. This allows the player to see what the would look like in game as they can't with it being a first person camera. This is good for when players add clothing to see what they look like.

I then added a mini map. This is done by using a render target texture and adding a second camera to the player and placing it above the player, looking down at them. This is very basic at the moment and only renders the terrain for the time being, I will look at adding more features to it at a later date.

After That I added example icons for some equipment the player may have picked up and also added the wood counter i made to the wood icon so that now when you gather wood it looks like you are storing it in the inventory. (Again functionality will need to be properly added later).
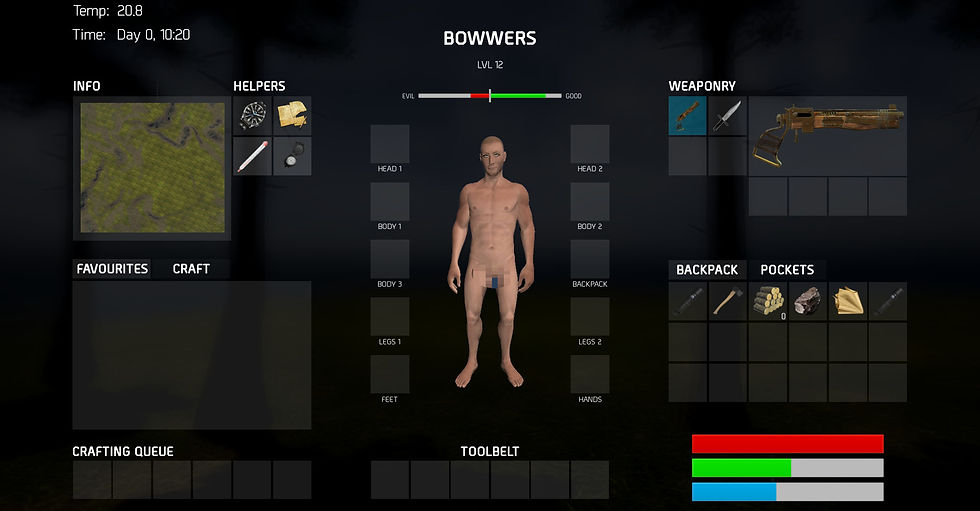
LAst but not least i added a progress bar (in the style of a thermometer) to the temp variable to make it more visually appealing and placed it below the player. It moves along the slider based on the current temp but also still shows the text of the temp in case the player wants to know what the exact number is. I also added a degrees celsius (°C) To the bar. I have the algorithm to change the degrees from celsius to fahrenheit so I may in a future update allow the player to choose which one they prefer and change it accordingly.

I also added some post processing effects to the view when the inventory is selected. It blurs out the environment which helps players to see the inventory better as they are not concentrating on something in the game, but at the same time, they can still make things out, for example an enemy attacking or a tree they want to chop down whilst still in the menu. Here is the effect below.
Effect off

effect on

Let me try and explain what the Info and helpers panel in the top left is all about. So if we take a look at the inventory below.
THere is nothing special about it, i have just copied an image i placed above just to give you a visual representation of what i'm talking about. So in the top left you can see the mini map, time and helper icons. Also take note of the thermometer below the player. So the idea here is that players can find helper items within the game. If they apply a helper to one of the four helper slots then that certain item will show itself on the interface. So in the example above. I have a map watch and thermometer, (ignore the compass that is not in yet). So if i was to remove an item from the helper slots, lets say the map icon, this would in turn disable the map. like in this example below.

Same goes for other items like the thermometer.

However notice that the time is still being displayed as i have a watch in the helper. I could add other items as the project progresses but i have to take into account screen space as i don't want to clutter the screen too much. This in now way works at the moment, i have just disabled them to show you the idea but I would like to get this working at some point.
Compass
Decided to get the compass in and working now so that it is out of the way. Proved a little tricky. Originally tried using a panner function on a material but i couldn't set the camera x axis so the way i did it was made the material a lot larger and then masked out the edges. Then in the player character i was able set a bearing based on which way i was looking and alter the position of the material based on that. I didn't want a physical compass (i.e. image of one with needle moving) as i think this works better within my u.i.
I also managed to get the East point of the compass to face the sun as in real life the sun rises in the east so it keeps it realistic.
I think i will add some indicators in between the bearings (N,E,S,W) and the lines as it is a bit bare and not as noticeable when you are between two bearings. Again for another day. Watch video below for example.
*EDIT* Went ahead and added extra bearings
Here is a video to show the inventory in action.


Comments